For all of you that might be a little bit of a “Weather Geek” like me, and care about your respiratory health, here is a project that may be of interest to you, especially with regard to environmental exposures monitoring, along with a standard local weather station. I have put together this project that you can build for yourself, and it can be expanded to measure other aspects of your local environmental/weather conditions as well. I have listed this project on Thingiverse (https://www.thingiverse.com/thing:7347425), and plan to put up a Github repository for the code, as well as an Instructables page to provide instructions for the build process.
*Everything here is a “Work In Progress”, so just know that things will change with regard to this project over time. At the end of this post, I will attach a BOM for those who wish to attempt this project.*
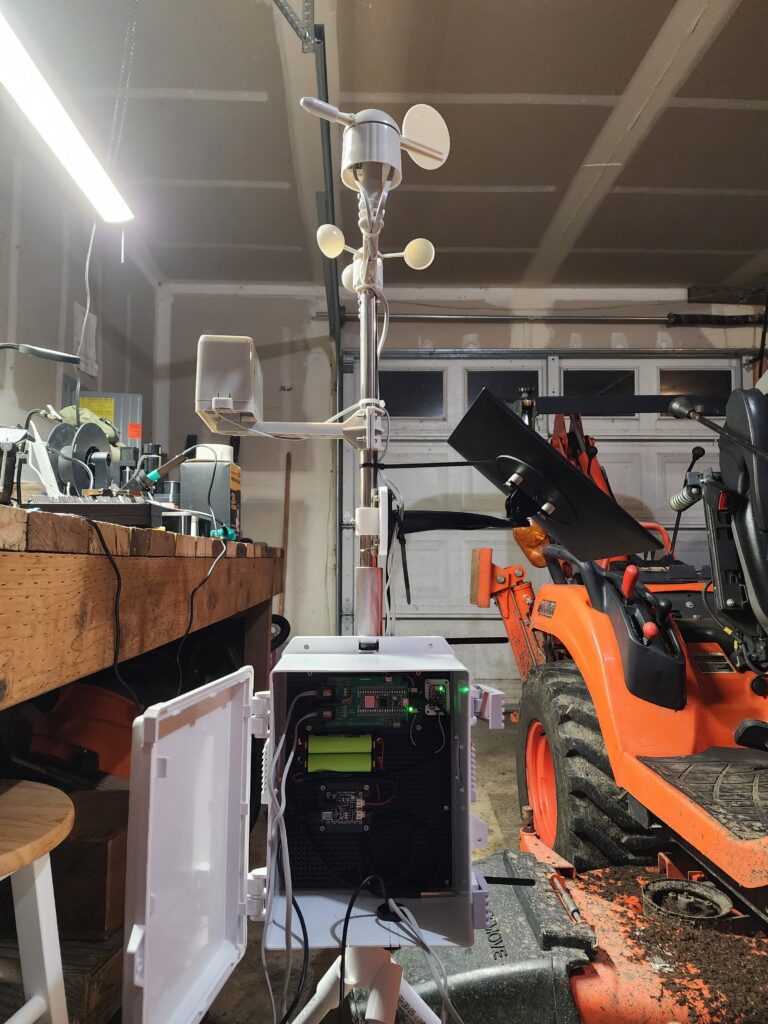
It is a Raspberry Pi Zero 2W/Raspberry Pico 2 based wireless indoor/outdoor environmental conditions station that happens to also function as a local weather station. For this project, I chose to use a Raspberry Pi Zero 2W for the main server “base” station, and 2 Raspberry Pico 2‘s for the “remote” devices, to take the following measurements:
- Outdoor Weather (With UV Index)
- Outdoor Air Quality (Particulate Matter)
- Indoor Air Quality (CO² Concentration)
The Raspberry Pi Zero 2W will function as the central server to receive and report the measurements of the 2 Raspberry Pico 2W sensor devices, and render the data it receives from them in the WeeWX webserver interface that you can access from your web browser on your computer, smartphone, or tablet on your local area network. It has has the following software installed:
- Raspberry Pi OS “Bookworm”
- WeeWX Open-Source Weather Station
- Eclipse Mosquitto MQTT Broker, acting as both a broker, and a subscriber to a single topic, “weatherpi”, just to keep things simple.
On the 2 Raspberry Pico 2‘s that I am using for this project, I have chosen to install Circuit Python onto them, since it is the most compatible version of Python for Adafruit Industries devices. Some of you might want to choose to use Micropython for this use case, but be forewarned that when I wrote this post, I found out that Micropython did not have working drivers for at least one of these device’s sensors – specifically the Bosch sensor on the Adafruit BME680. As an added bonus, CircuitPython provides a builtin lightweight webserver interface that can be accessed over your local area network (LAN) for troubleshooting, device resetting, and easily editing/updating the code contained on each Raspberry Pico 2W unit. This has definitely come in handy for me on more than one occasion.
In my setup, the Raspberry Pico 2‘s take the following sensor readings:
- Temperature ( in °C)
- Barometric Pressure (in hPa/mbar)
- Humidity (%)
- Carbon Dioxide, CO² (ppm)
- Wind Speed (km/h)
- Wind Direction (0-359°)
- VOC Readings (in Ohms)
- Solar Radiation (in W/m²)
- Precipitation (cm)
- Particulate Matter (1 μg/m³, 2.5 μg/m³, and 10 μg/m³)
The first of the Pico’s in this setup will be located outdoors, and the second one will be indoors. The first Pico (we’ll call that one “AQO-Pico”). It will be taking the following measurements:
- Temperature
- Barometric Pressure
- Humidity
- Wind Speed
- Wind Direction
- VOC Readings
- Solar Radiation
- Precipitation
- Particulate Matter
It is important to note here that AQO-Pico will be taking an air quality index measurement, in the form of a particulate matter measurement, given in μg/m³. It senses particulate matter of various sizes, and the ones that we will be measuring are in the 1 μg/m³, 2.5 μg/m³, and 10 μg/m³ ranges respectively.
Particulates 2.5 μg/m³ or smaller are the ones that are “bad” for us, since these are ones that are small enough to enter our aveoli (the small sacs in our lungs that allow oxygen to get into the bloodstream), and negatively impact our health – pretty much immediately for people with breathing problems, like asthma or bronchitis, and for healthier individuals, they cause harm over time, contributing to “wonderful” 🤢 diseases like COPD, emphysema, and lung cancer.
But enough of the health science stuff for now, let’s get back to the topic at hand – the weather station build!
Okay, so the second Pico in my setup(which I will call “AQI-Pico”), will be tasked with measuring the following values indoors:
Just as outdoor particulate matter can be harmful to our health, excessively high indoor concentrations of CO² can be harmful to us as well, that is why measuring it is important.
Ok, so now that we know what devices we have in our setup, and what they will be doing/measuring, we can now move on to the sensors portion of things. For this project, I chose to use the following sensors, sourced from Adafruit Industries:
- Adafruit BME680 Temperature, Humidity, Pressure and Gas Sensor, which also measures ambient VOC‘s.
- Adafruit SCD 40 True CO2, Temperature and Humidity Sensor, which has now been superseded by the Adafruit STCC4 and SHT41 – CO2, Temperature & Humidity Sensor, as of April 2026.
- Adafruit PMSA003I Air Quality Breakout, which is unfortunately no longer available as of April 2026, but may be in the future.
- Adafruit LTR390 UV Light Sensor, which not only measures ambient light, but more importantly for our purposes, UV light as well.
The one sensor I did not buy from Adafruit, but is included in this build, is the ds18b20 temperature sensor, which is used to measure ambient temperature. I installed it on the mast of the Weather-Pico outdoor unit, housed in
For the weather monitoring part of things, including the wind direction, wind speed, and precipitation measurements, I bought the Wind/Rain Sensor Assembly from Argent Data Systems, since it was much cheaper than I could find it anywhere else on the Internet.
To make things a simple as possible to cleanly connect the Wind/Rain sensor assembly, I chose to get the BC Robotics Raspberry Pi Pico 1591B Weather Board, with which I am really impressed/super happy about, save for 2 caveats:
- You have to solder the Raspberry Pico 2W to it, so you should have good soldering skills, and the right equipment to do the soldering.
- If you are having it shipped to the U. S., you will pay more in tariffs than you will for the PCB. It cost me $16.78 USD for the board itself, and I ended up paying $89 USD for it by the time I paid for shipping, tariffs, and brokers fees to get it across the border. I think the shipping cost was $11 for my order, from Nanaimo, British Columbia, Canada, to Mossyrock, Washington, USA (188 miles).
For the power supply end of things, I bought the following items:
- Adafruit Universal USB / DC / Solar Lithium Ion/Polymer charger – bq24074
- A 18650 Battery Holder, 2 Slot (You can get bigger ones with more slots)
- A solar panel for charging, 10W. (You can go bigger here as well, especially in latitudes with lower sun exposure)
- An upgraded solar panel, 25W, 12-18V, which is better for those of us in Northern latitudes, like here in the Pacific Northwest (PNW)
- A larger battery holder, for those long nights and dark days here in the PNW.
- A buck converter, for converting 12-18V down to 5V for the Adafruit battery charger.